Ads
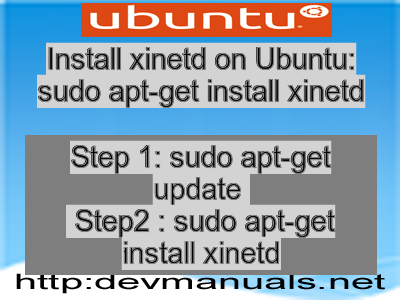
Quick installation of xinetd:
Step 1: Update system:
sudo apt-get update
Step 2: Install: xinetd
Ater updaing the OS run following command to install the packae:
sudo apt-get install xinetd
Package Details | |
| Package: | xinetd |
| Version: | 1:2.3.14-7ubuntu4 |
| Maintainer: | Ubuntu Core Developers |
| Home page: | http://www.xinetd.org |
| Description: | replacement for inetd with many enhancements xinetd has access control mechanisms, extensive logging capabilities, the ability to make services available based on time, and can place limits on the number of servers that can be started, among other things. . It has the ability to redirect TCP streams to a remote host and port. This is useful for those of that use IP masquerading, or NAT, and want to be able to reach your internal hosts. . It also has the ability to bind specific services to specific interfaces. This is useful when you want to make services available for your internal network, but not the rest of the world. Or to have a different service running on the same port, but different interfaces. Homepage: http://www.xinetd.org |
| Distro: | Ubuntu 12.04 LTS |
| Release: | |
| Repo/Section: | net |
How to install xinetd on Ubuntu 12.04 LTS?
First of all update your system with the command:
sudo apt-get update
Ads
Above command will download the package lists for Ubuntu 12.04 LTS on your system. This will update the list of newest versions of packages and its dependencies on your system.
After downloading the latest package list with the help of above you can run the installation process.
If xinetd is not installed on your compter then the command 'dpkg -L xinetd' will give followin error.
deepak@deepak-VirtualBox:~$ dpkg -L xinetd
Package `xinetd' is not installed.
Use dpkg --info (= dpkg-deb --info) to examine archive files,
and dpkg --contents (= dpkg-deb --contents) to list their contents.
deepak@deepak-VirtualBox:~$
Installing xinetd:
After system update use the following command to install xinetd:
sudo apt-get install xinetd
Above command will confirm before installing the package on your Ubuntu 12.04 LTS Operating System. If you are not already logged in as su, installer will ask you the root password. After completion of the installation you can use the package on your system.
How to uninstall/remove xinetd from Ubuntu 12.04 LTS?
Now we will see the commands for uninstalling the xinetd from Ubuntu 12.04 LTS. For uninstalling this package you can easily use the apt command and remove the package from Linux Operating System.
To remove the xinetd following command is used:
sudo apt-get remove xinetd
Following command is used to remove the xinetd package along with its dependencies:
sudo apt-get remove --auto-remove xinetd
This will remove xinetd and all its dependent packages which is no longer needed in the system.
Completely removing xinetd with all configuration files:
Following command should be used with care as it deletes all the configuration files and data:
sudo apt-get purge xinetd
or you can use following command also:
sudo apt-get purge --auto-remove xinetd
Above command will remove all the configuration files and data associated with xinetd package. You can can't recover the delete data, so, use this command with care.